
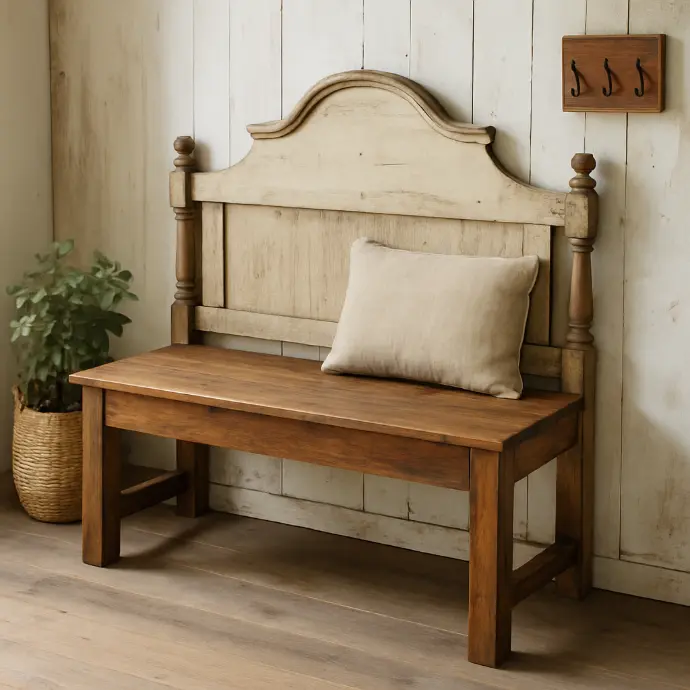
Looking to add a touch of vintage charm to your home while saving space and money? Discover the timeless appeal of creating your own diy headboard bench from old wood. Reclaimed wood projects bring warmth, history, and sustainability into your living space, and few pieces capture this as perfectly as a handmade bench crafted from an old headboard.
Whether you're exploring living room chair ideas for small spaces or planning a unique DIY project to upgrade your hallway, this reclaimed wood headboard bench tutorial will help you craft a piece that's both functional and full of character. From sourcing materials to finishing details, we’ll walk you through every step, so you can build a bench that feels truly your own.

Why Choose a DIY Headboard Bench from Old Wood?
Repurposing reclaimed wood and antique headboards into benches isn't just about aesthetics — it’s a creative, eco-friendly approach to home decor. Here’s why these projects stand out:
Eco-friendly benefits: Reclaimed wood reduces demand for new lumber, preserves natural resources, and keeps charming old pieces from ending up in landfills.
Cost-effective: Vintage headboards, often found at flea markets or thrift shops, can be transformed into unique benches at a fraction of the cost of buying new.
Character and story: The scratches, dents, and original paint layers add authentic personality that mass-produced furniture simply can't match.
A small entryway bench from headboard combines sustainability and style, perfect for tight spaces — just like living room chair ideas for small spaces help maximize functionality without sacrificing design.
Tools & Materials Needed
Before diving into your easy headboard bench diy project, gather these tools and materials:
Tools:
Saw (circular or hand saw)
Drill and screws
Sandpaper or electric sander
Wood glue
Tape measure
Paintbrushes
Clamps
Materials:
Vintage or antique headboard
Reclaimed wood planks for the seat and support
Legs or wooden posts (from old chairs or tables work too)
Wood stain, paint, or wax (for a rustic, farmhouse, or shabby chic finish)
Optional: cushions, baskets, or throw pillows
When choosing your style, consider whether you’d prefer a farmhouse style headboard bench diy, rustic bench from reclaimed headboard, or a shabby chic headboard bench diy. Each brings its own charm to your finished piece.
Step-by-Step Reclaimed Wood Headboard Bench Tutorial
Let’s bring your vision to life with these steps. This reclaimed wood headboard bench tutorial uses simple methods so even beginners can create a stunning, durable bench.
Step 1 – Find and Prepare Your Vintage Headboard
The first step to build bench with vintage headboard is sourcing your piece. Look for sturdy headboards at thrift shops, yard sales, or salvage yards. Once found:
Inspect for cracks, pests, or loose joints.
Sand thoroughly to remove old varnish, dirt, and smooth rough spots.
Repair or replace damaged parts with reclaimed wood.
This preparation ensures your finished bench will last and maintain its vintage appeal.
Step 2 – Cut and Assemble the Frame
Now it’s time to craft the body of your rustic bench from reclaimed headboard:
Measure the desired seat length and cut reclaimed wood planks accordingly.
Attach the seat to the bottom edge of the headboard using wood glue and screws.
Reinforce with brackets if needed for stability.
The mix of old headboard and reclaimed planks adds depth and rustic beauty to your project.
Step 3 – Secure the Legs and Backrest
For your repurposed wood headboard into bench, choose sturdy legs:
Cut legs to your preferred bench height (typically 16–18 inches).
Attach securely under the seat with screws and wood glue.
Check for balance and adjust if necessary.
Use reclaimed table legs or thick wooden posts to keep the vintage look consistent.
Step 4 – Finish with Paint or Stain
Personalize your bench to match your home's style:
For a farmhouse style headboard bench diy, choose light stains or chalk paint.
For a shabby chic headboard bench diy, whitewash and distress lightly for a timeworn effect.
Seal with a matte wax or polyurethane for durability.
A thoughtfully chosen finish can tie your bench into your decor seamlessly.
Design Ideas to Match Your Space
Adding creative touches can help your bench feel intentional and beautiful:
Place baskets or storage bins beneath for shoes, scarves, or books.
Add soft cushions for comfort, using floral or linen fabrics to suit your style.
Mount hooks or a shelf above for coats and bags in an entryway.
Use an antique headboard for authenticity and depth.
“For tight spots, a small entryway bench from headboard works wonderfully, much like living room chair ideas for small spaces help maximize seating without crowding the room.”
Rustic & Farmhouse Variations
There’s no single way to style your reclaimed bench. Explore these variations:
Farmhouse style headboard bench diy: Pair distressed white paint with gingham or linen cushions.
Rustic bench from reclaimed headboard: Keep wood natural with visible grain and darker stain for warmth.
Shabby chic headboard bench diy: Whitewash with pastel fabrics or floral prints for a romantic look.
Each style highlights the bench's unique history while matching your personal aesthetic.
Tips for an Easy Headboard Bench DIY Project
To make your easy headboard bench diy project truly stress-free, keep these tips in mind:
Start simple: Choose straightforward designs if you're a beginner.
Use reclaimed wood with minimal warping for easier assembly.
Measure twice, cut once: Double-check dimensions before cutting.
Seal well: Protect your bench from daily wear with quality finishes.
These steps help you build confidently, turning old wood into a bench that's stylish and durable.
Styling Your New Bench in the Home
Wondering where to place your finished bench? Consider these ideas:
Entryway: Store shoes in baskets beneath and hang coats above.
Bedroom: Place at the foot of the bed for blankets or accent pillows.
Living room: Add extra seating, especially in smaller layouts.
“Pairing your diy bench using antique headboard with compact armchairs can transform tight living areas, similar to the inspiration behind living room chair ideas for small spaces.”
By styling thoughtfully, your bench becomes more than furniture — it becomes part of your home's story.
FAQs about DIY Headboard Benches
Can I build a bench with a broken headboard?
Absolutely! Reinforce it with reclaimed wood planks or brackets for strength.
How much does a diy headboard bench from old wood cost?
If you reuse materials, it can cost very little — often under $50–$100, depending on paint or extras.
Best wood finish for a farmhouse style headboard bench diy?
Matte paint or soft wax finish enhances rustic charm and keeps the wood's natural texture visible.
Final Thoughts
Transforming an old headboard into a bench blends creativity, sustainability, and style. This project lets you breathe new life into forgotten pieces, adding personality to your entryway, living room, or bedroom.
“Whether you create a shabby chic headboard bench diy, a rustic bench from reclaimed headboard, or a small entryway bench from headboard, your unique touch adds warmth and personality.”
Ready to get started? Gather your tools, find that vintage headboard, and share your finished diy headboard bench from old wood with us — your creativity might inspire someone else to give reclaimed wood a second life.